Working with multimedia files
- Getting information from video (Mediainfo)
- Cropping a multimedia file
- Multimedia conversion
- Video converter
- Merging video files into one
- Converting audio files
- Changing the video container
- Document format conversion
- Image cropping
- Editing streams and meta tags in the media container
- Screenshot/Screenlist Generator
Getting information from video (Mediainfo)
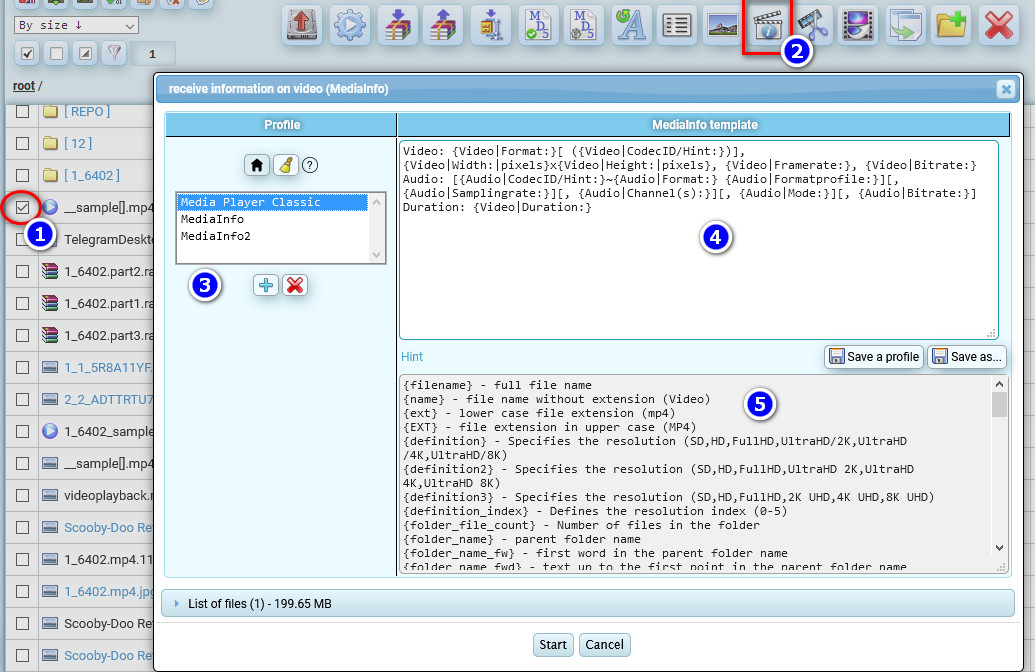
- Select media files
- Click the Mediainfo button
- Profiles with different templates for Mediainfo
- Mediainfo template
- A description of the variables for the Mediainfo template
In addition to the template variables enclosed in curly brackets {variable_name}, square brackets [group1~group2] are used. Where the ~ symbol divides the text inside into groups. The first group (searching from left to right), where the variables inside have a nonempty value, will be inserted instead of all the content enclosed in square brackets. This allows for variability in the formation of video information, because sometimes one type of information is specified for one type of video, and for another type, there is no information, but there is other information in other variables. If all variables inside square brackets are empty, everything in square brackets will be ignored.
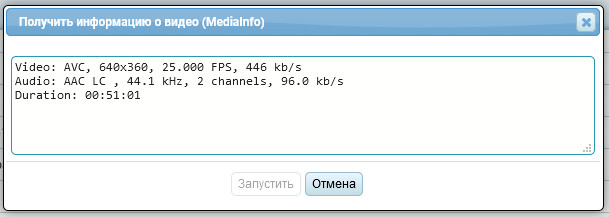
Here is an example of getting information from the pattern in the top screenshot:
A complete list of variables to be used in the template:
{filename} - full file name
{name} - file name without extension (Video)
{ext} - lower case file extension (mp4)
{EXT} - file extension in upper case (MP4)
{definition} - Specifies the resolution (SD,HD,FullHD,UltraHD/2K,UltraHD/4K,UltraHD/8K)
{definition2} - Specifies the resolution (SD,HD,FullHD,UltraHD 2K,UltraHD 4K,UltraHD 8K)
{definition3} - Specifies the resolution (SD,HD,FullHD,2K UHD,4K UHD,8K UHD)
{definition_index} - Defines the resolution index (0-5)
{folder_file_count} - Number of files in the folder
{folder_name} - parent folder name
{folder_name_fw} - first word in the parent folder name
{folder_name_fwd} - text up to the first point in the parent folder name
{folder_name_fws} - text before the first space in the parent folder name
{folder_name_fwds} - text up to the first space or point in the parent folder name
{file_name_fwds} - text up to the first space or point in the file name
{file_name_adswoext} - text from the first space or dot in the file name, without extension
{file_name_a2dswoext} - text from the second space or dot in the file name, without extension

Scan the folder and define the image resolutions inside it
{folder_iminx} - minimum X
{folder_iminy} - minimum Y
{folder_imaxx} - maximum X
{folder_imaxy} - maximum Y

{General|Format:} - Format (AVI)
{General|Format/Info:} - Format description (Audio Video Interleave)
{General|Filesize:} - File size (49.6 MB)
{General|Duration:} - Duration (01:02:03)
{General|Overallbitrate:} - Average bitrate (2,979 Kbps)

{Video|Format:} - Video Format (MPEG-4 Visual)
{Video|Formatprofile:} - codec profile (Advanced Simple@L5)
{Video|CodecID:} - Codec ID (XVID)
{Video|CodecID/Hint:} - Text description of the codec name (XviD)
{Video|Duration:} - Video duration (01:02:03)
{Video|Bitrate:} - Bitrate (2 760 Kbps)
{Video|Width:|pixels} - Width (720)
{Video|Height:|pixels} - Height (480)
{Video|Displayaspectratio:} - Picture proportions (3:2)
{Video|Framerate:} - Frame rate (25,000 fps)
{Video|Standard:} - TV standard (NTSC)
{Video|Colorspace:} - Color format (YUV)
{Video|Chromasubsampling:} - Quantum Format (4:2:0)
{Video|Bitdepth:} - Bit of color format (8 bits)
{Video|Scantype:} - Progressive video order
{Video|Compressionmode:} - Loss of information when compressing (Lossy)
{Video|Bits/(Pixel*Frame):} - Bits/(Pixels*frame) (0.319)
{Video|Streamsize:} - Video data size (45.9 MiB (93%))

{Audio|Format:} - Audio format (MPEG Audio)
{Audio|Formatversion:} - Audio format version (Version 1)
{Audio|Formatprofile:} - Profile of the audio format (Layer 3)
{Audio|Format/Info:} - Decrypt the audio format (for AC3 there will be "Audio Coding 3")
{Audio|Mode:} - Audio mode (Joint stereo)
{Audio|Modeextension:} - Mode Extension (MS Stereo)
{Audio|CodecID/Hint:} - Text description of the codec name (MP3)
{Audio|Duration:} - Duration (2mn 19s)
{Audio|Bitratemode:} - Bitrate mode (Constant)
{Audio|Bitrate:} - Bitrate (128 Kbps)
{Audio|Bitdepth:} - Bit depth (24 bits)
{Audio|Channel(s):} - Channels (2 channels)
{Audio|Samplingrate:} - Sampling rate (44.1 KHz)
{Audio|Compressionmode:} - Loss of information when compressing (Lossy)
{Audio|Streamsize:} - Audio data size (2.13 MiB (4%))
{Audio|Alignment:} - Aligned on interleaves mode
{Audio|Interleave,duration:} - Time between audio blocks (250 ms (6.24 video frames))
{Audio|Interleave,preloadduration:} - Audio data preload (182 ms)
{AudioStreams|Languages:} - List of audio tracks languages, separated by commas
{SubtitleStreams|Languages:} - List of subtitle tracks languages, separated by commas
{full_lng} - List of audio track languages in full words, separated by commas
{full_sub_lng} - List of subtitle track languages in full words, separated by commas

[{Audio|Language:}~{Audio|Title:}] - Language of audio stream (English)
[{Audio|Commercialname:}~{Audio|Format:}] - Audio format definition  (DTS-HD Master Audio)
If there are multiple audio tracks in a video file, the audio information line in the template will be automatically multiplied to output information about each audio track
Cropping a multimedia file
Let's say you have a video or audio file and you need to cut a small piece as a sample, or you need to split the video into several parts. There is a special tool for this purpose.
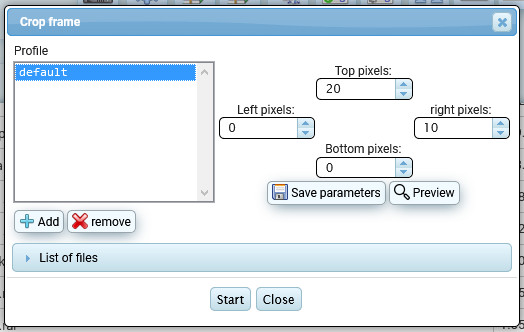
- Select files to crop
- Press the crop media button
- Select the desired profile
- Set the time interval for the start and end of the cut sample.
- The trimmed file will be created with a name with this text at the end
- You can create an animated GIF from the original video file
- GIF file resolution options
- The frame rate of the GIF file
- Two passes of encoding will take twice as long, but the visual quality of the GIF will be higher.
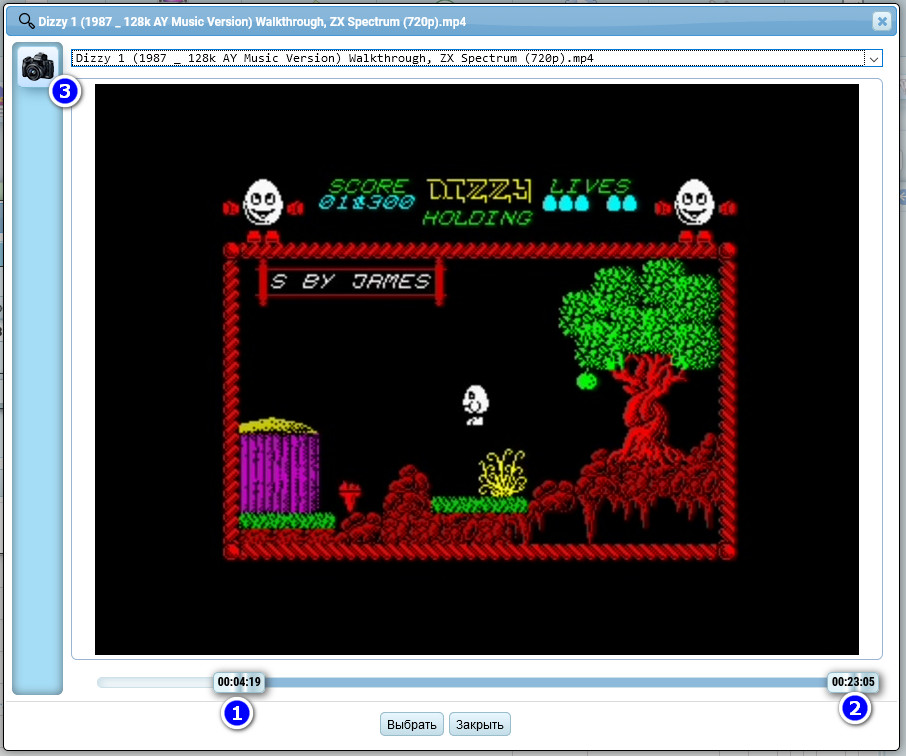
- You can use the timeline slider to select the start and end frame by frame for the cut clip (see below)
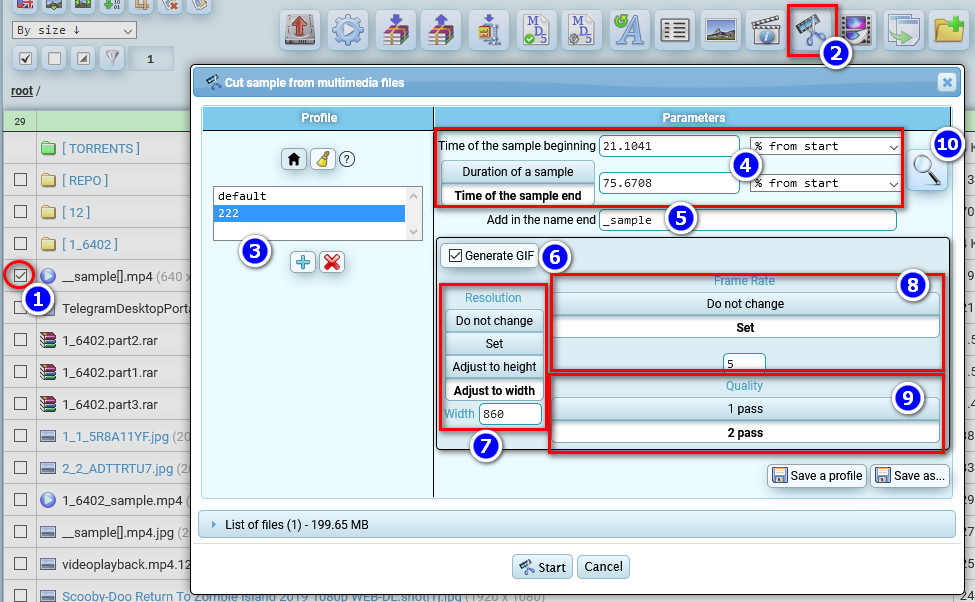
If you click on button 10, it opens a window for selecting the beginning 1 and the end 2 of the clip you want to cut, you can visually define timestamps, and button 3 saves the current screenshot in the root folder.
Multimedia conversion
Video converter
The cost of video conversion is measured in the time it takes the service to convert. The current cost is $0.2 per conversion hour. Conversion time has nothing to do with the duration of the video itself. It depends on encoding time only. The stronger compression ratio is, the longer encoding process will take and vice versa.
- Select video files
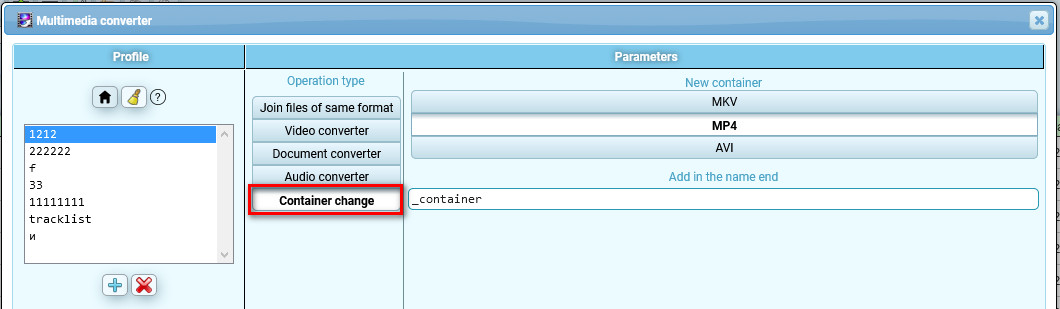
- Press the multimedia converter button

- select the desired profile or create a new one
- Select the "video converter" option
- Choose target video container, MP4 / MVK / AVI
- New video file will be created with this text at the end

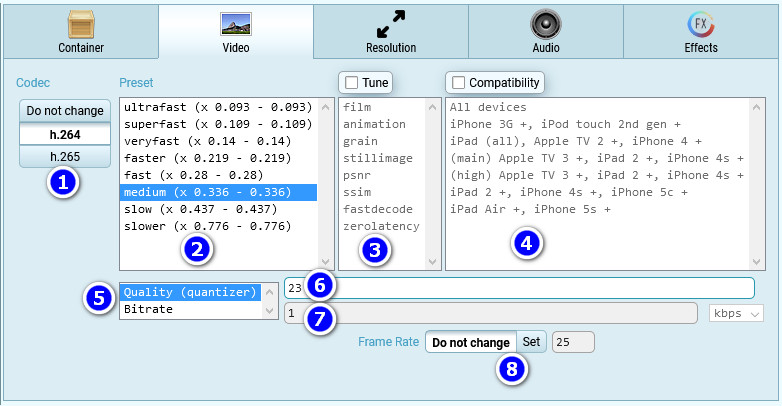
- Video codec
- A preset that affects the encoding time. The coefficient indicates how long it will take to encode relative to the actual duration of the video. For example, if video is 1 hour long and the coefficient is 0.776, then it will take approximately 1 x 0.776 = 0.776 hours to encode.
- Special settings for different video types (optional)
- Allows compatibility with specified devices to be enforced
- The visual quality of the picture can be specified through quantizer or through bitrate. The smaller the number, the better the visual quality of the picture, but the bigger the final size of the video file and vice versa.
- By default the quantizer is set to 23, a balance between visual quality and file size. Allows you to get a constant picture quality.
- Bitrate limits the data size for video streams (not related to picture quality), so the higher limit you set, the better picture quality you get by increasing file size. Allows you to get a stable file size, regardless of the quality of the picture, it can be different throughout the video.
- Allows you to set the desired frame rate for the video, or leave it as is.
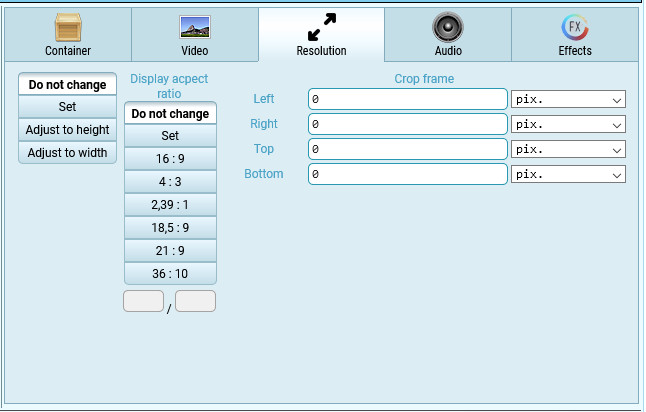
Frame resolution settings
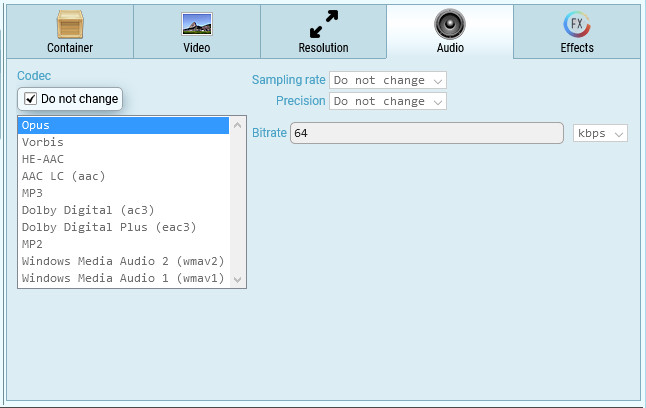
Audio settings
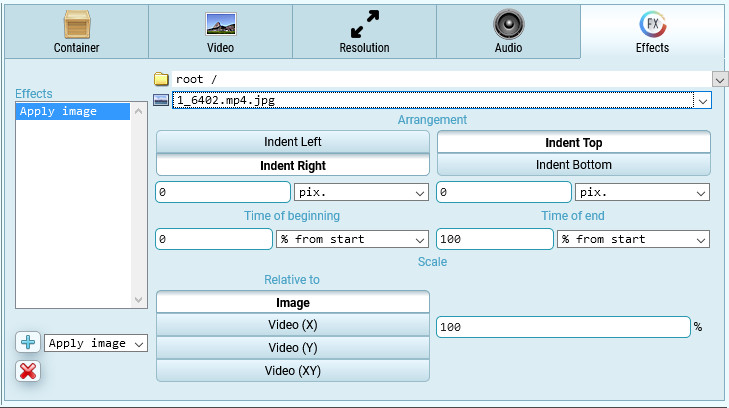
Overlaying images on video
Viewing video conversion progress
Click the "media converter" tab
- Since all videos go into the shared conversion queue, you may find yourself in a situation where you need to transcode a video urgently, but the queue is full for a long time in advance. In this case you can raise the upper limit of the cost per conversion hour. As soon as the active task completes, the video with the highest maximal cost will be selected from the queue. And if there are no other videos with an even higher upper cost bar, the selected video will be transcoded with a price of 1 cent more than the video in the queue that has a lower cost (to avoid you overspending). If there are no competing videos in the queue, the maximum price bar will be ignored and the video will be converted at the minimum price.
- Slider that allows you to adjust the upper limit of conversion price
- Balance available to use for conversion. By clicking the purchase button, you can transfer the remaining paid time of the service to the balance of the video converter.
- The current conversion rate per hour.
- Journal with the history of all conversion operations
- List of your currently running tasks for video conversion
- Common list of tasks for video conversion for all users of the service

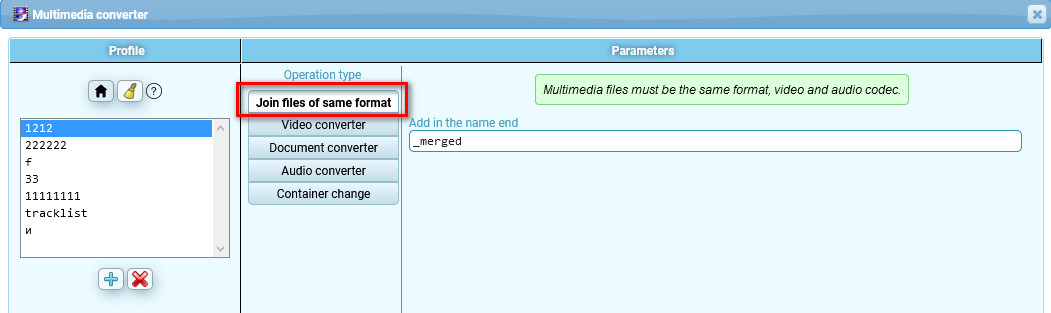
Merging video files into one
- Select video files
- Press the multimedia converter button
Simply select several video files that have identical resolution, frame rate, and video codec settings. If the video files have different parameters, you will not be able to merge them. Then you will need to use the video transcoding function to make all the video files compatible.
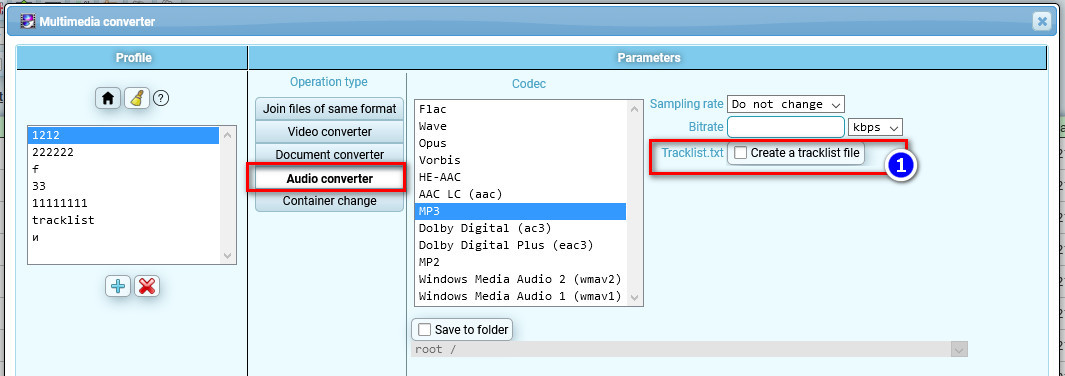
Converting audio files
- Select video files
- Press the multimedia converter button
- Option to create after conversion a text file with the tracklist of transcoded audio files (tracklist.txt)
Changing the video container
- Select video files
- Press the multimedia converter button
If the video codec supports, you can quickly change the video file container without re-encoding the video. Three types of containers are supported: MVK, MP4, AVI.
Document format conversion
- Select video files
- Press the multimedia converter button

Image cropping
On the right side of the file list there is a button for cropping images

Select how many pixels you want to crop on all 4 sides of the image and you can save the settings to a profile for later use. By clicking on the "preview" button you can see the preliminary result of the cropping according to the specified settings.
Editing streams and meta tags in the media container
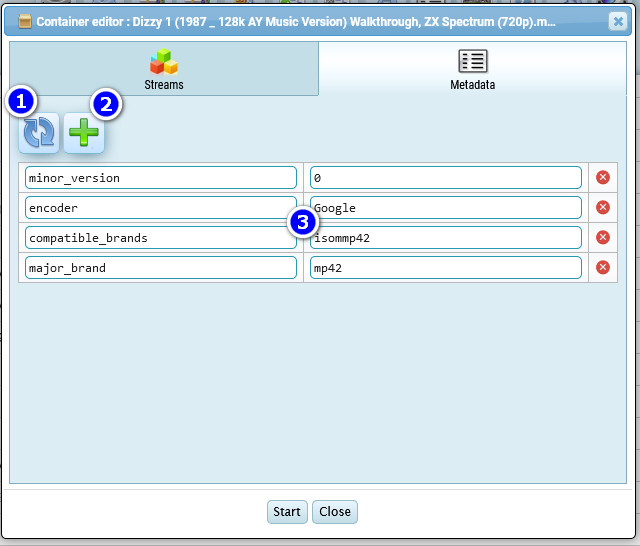
In the file list on the right side of the video files there is a button to edit streams and container meta tags.

- You can change the container type (not all video codecs are supported by all containers, there are limitations)
- The refresh button of the streams list, reads streams from the source video and displays them as a list below. Streams are tracks. They can be video, audio, image, subtitle and other supported types.
- Select the folder where the stream file you want to add to the list is located
- Selection of the stream file you are going to add to the container list
- Button for adding a new selected stream from the file
- Streams list
- Button to quickly delete all the streams with subtitles from the list.

If you switch to the "metadata" tab you can edit the meta tags contained in the media container
Screenshot/Screenlist Generator
Screenshot - a single shot/frame taken from the video
Screenlist - an image with multiple frames taken from different places in the video.
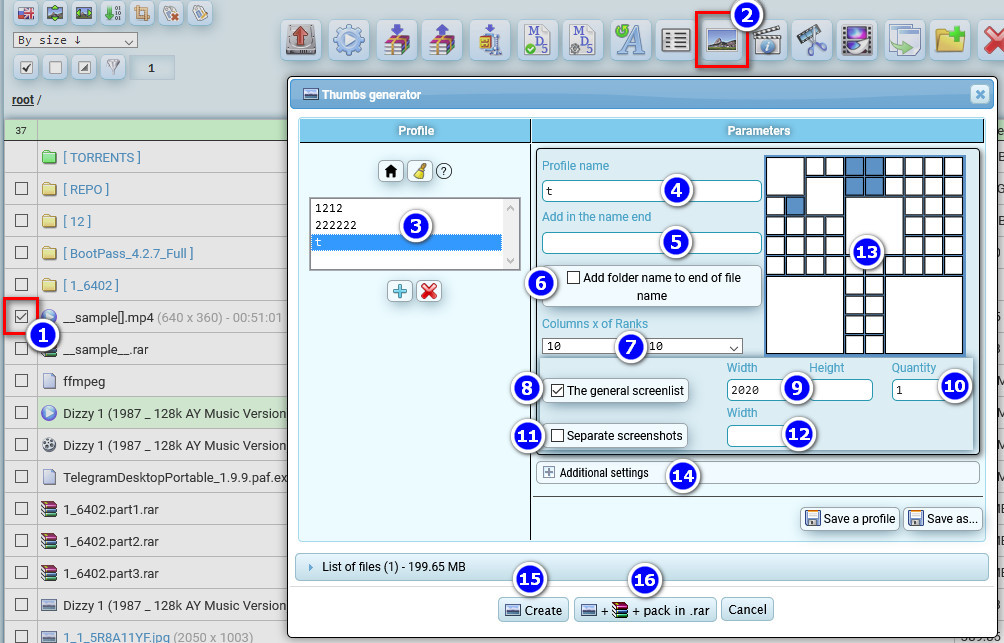
- Select video files
- Click the screenshot generator button
- List of profiles with screenshot generator settings
- Selected profile name.
- If you are going to run several profiles with different generator settings for one file, you will get screenshots/screenshots with the same file names. To avoid overwriting files with the same name by different profiles, you may want to add the text to the end of the screenshot or screencast to avoid file name conflicts.
- This option allows you to add the name of the parent folder to the end of the screenshot or screenlist file name
- Select the number of columns and rows for the screenlist
- This option enables generation of a screenlist
- You can limit the maximum size of the screenlist. Useful when high resolution video and many frames will give too large a width or height of the screenlist.
- If you need to make several versions of the screenlists, you can specify the number. The point is that during the generation of frames for the screenlist, the timestamps from which the frame will be taken are determined with the addition of randomness. For more variability.
- If you enable this option, all frames used (or not used) for the screencast will be saved separately
- You can limit the maximum width of individual frames.
- This is a visual layout for the screenlist. By clicking the left mouse button you can turn on/expand the cells for the frames. Click the right mouse button to turn on/shrink the cell for the frames.
- Additional settings (see below)
- Button to start a generator
- This button starts the generator, after which the archiver will be started and all the obtained screenshots/frames will be moved to a separate archive.
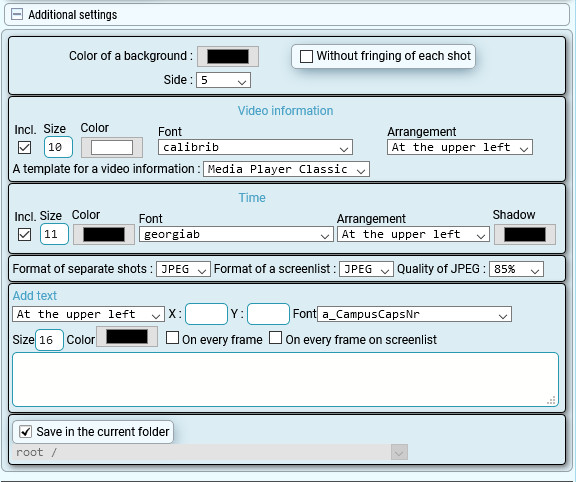
Additional settings
Template for video information can be edited in Mediainfo section