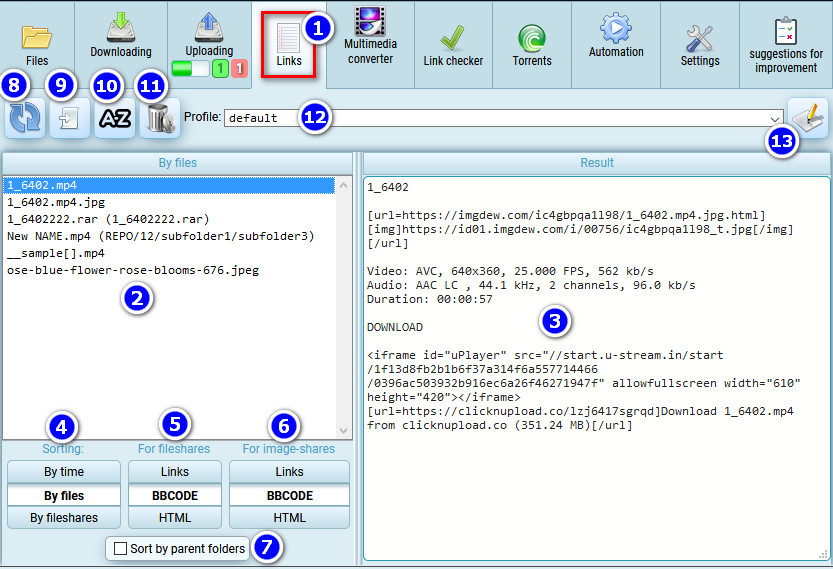
Getting formatted links or posts
The service monitors what you do with your files and is able to summarize this information to give you well-formatted links in simple, BBCODE and HTML form. And, by editing the template, you can generate a ready-made post to be published on the Internet.
The upload (links), archiving (archives), and retrieval of media information (mediainfo) operations are tracked.
- Click the "links" tab.
- Choose a file name (upload date or file exchange, according to switch 4)
- This displays the text result of the formatting
- A radio button allows you to choose the time of the upload, the file name or the file exchange name from a list (2)
- The switch allows you to choose the type of formatting for the filesharing links
- "links" - no formatting
- "BBCODE" - formatting of view [URL=link]title[/URL]
- "HTML" - formatting of the <a href='link'>title</a> look.
- Similar to switch (5), but for links of photo exchangers.
- If the switch (4) is set to "by file", then you can apply sorting to files in the list (2) relative to the directories where these files were located. The directories themselves are displayed in brackets to the right of the file name
- Refresh the list (2) forcibly
- Import links if you have uploaded them outside of the service. It's very important to have a filename at the end of the link, and preferably without special characters. The symbol _ will be treated as a space in the original name. If link filenames are found in the current directory, they will be imported into the system for post or link formatting.
- Allows you to change the sort order of file exchangers in the results window (3)
- Button to clear all links and related information.
- Current formatting profile.
- Editing formatting profiles.
Editing a format profile
For all text fields except the template window, the following variables apply and their values will be substituted in the text (with replacement)
{l} -> link
{n} -> filename
{nwe} -> filename without extension
{f}/{F}/{Fn} -> file share
{ff}/{FF}/{FFn} -> file share domain
{s} -> size
{ts} -> total size of all parts of the archive
{ext} -> file extension
{nl} -> switch to a new line
{x} -> archive part number
{num} -> serial number of the link relative to the passage number for the file share
{num2} -> serial number of the link relative to the file share- Formatting profiles
- Link
- The prefix and suffix will be added before and after the formatted link (at the very end of the formatting) For example PREFIX_[url=link]title[/url]_SUFFIX
- Similar to (3) but only for photo sharing links
- Link title (e.g. [url=link]TITLE[/url]
- By default links are placed in the text line by line, but you can switch to display them on a single line (separated by a space)
- Allows for RAR volumes to group all links in special block and apply special formatting for them
- Disables link formatting for RAR volumes, links will be pasted as usual
- Within a group of links of RAR volumes you can choose how to separate links (new line, space, empty line, merge)
- Group prefix and suffix, will be inserted before and after whole block of RAR volume links
- The group link prefix and suffix will be inserted before and after each link within the RAR volume link block
- Link and link title for links within a group of RAR volumes. Example [url=LINK]TITLE[/URL]
- If you enable template generation here, instead of a list of formatted links, you can generate a finished post consisting of logical blocks (see below)
- Instead of generating one post including all links to all photo sharing sites where you uploaded the images, generated from the source video file, you can create separate posts with links to different photo sharing sites (the same duplicated post, but with a new photo sharing site each time)
- Choose how you want to separate the links to photo sharing (new line, space, empty line)
- Template for a text formatting if the switch (13) is enabled
- If template formatting is enabled, the resulting posts will be separated by this separator.
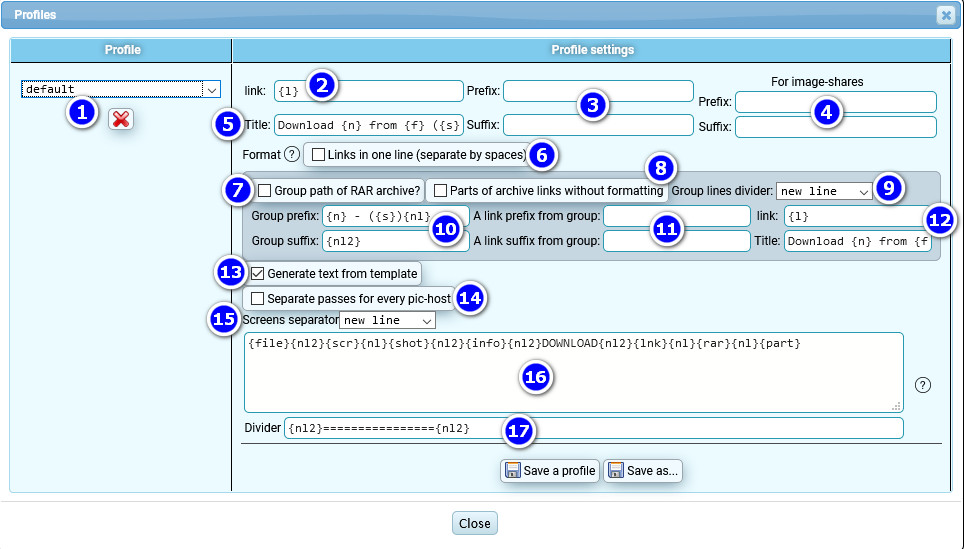
Variables for a template:
{file} -> inserts filename
{scr} -> inserts screen-list
{shot} -> inserts individual screenshots
{info} -> inserts mediainfo
{lnk} -> inserts links
{rar} -> inserts entire archives
{part} -> inserts archives volumes
{nl} -> inserts line break
{nl2} -> inserts 2 line breaks
{folder} -> inserts parent folder name
{foldersp} -> inserts parent folder name, replaces dots with spaces
{size} -> inserts file size
{ext} -> inserts the file extension in lowercase
{EXT} - inserts uppercase file extension
By default, the template looks like this:
{file}{nl}{scr}{nl}{shot}{nl}{info}{nl}DOWNLOAD{nl}{lnk}{nl}{rar}{nl}{part}Which allows you to form the next post in the following order:
- File name
- links to screen-lists
- links to individual screenshots
- video info (mediainfo)
- word "DOWNLOAD"
- usual links
- Links to entire archives
- Links to archives volumes